> ## Documentation Index
> Fetch the complete documentation index at: https://cometchat-22654f5b-docs-platform-docs-release.mintlify.site/llms.txt
> Use this file to discover all available pages before exploring further.

# React.js Integration

> Add CometChat to a React.js app in 4 steps: create project, install, wrap in CometChatProvider, run.

<Accordion title="AI Integration Quick Reference">
  | Field            | Value                                                                                                                                                    |
  | ---------------- | -------------------------------------------------------------------------------------------------------------------------------------------------------- |
  | Package          | `@cometchat/chat-uikit-react` v7.0.x                                                                                                                     |
  | Peer deps        | `react` >=18, `react-dom` >=18, `@cometchat/chat-sdk-javascript` ^4.1.9, `dompurify` ^3.3.1                                                              |
  | Setup            | Wrap app in `<CometChatProvider appId="..." region="..." authKey="..." uid="...">`                                                                       |
  | Auth Key         | Dev/testing only. Use `authToken` prop in production                                                                                                     |
  | CSS              | `import "@cometchat/chat-uikit-react/styles";`                                                                                                           |
  | Calling          | Optional. Install `@cometchat/calls-sdk-javascript` and set `callingEnabled` prop                                                                        |
  | Other frameworks | [Next.js](/ui-kit/react/v7/integration-nextjs) · [React Router](/ui-kit/react/v7/integration-react-router) · [Astro](/ui-kit/react/v7/integration-astro) |
</Accordion>

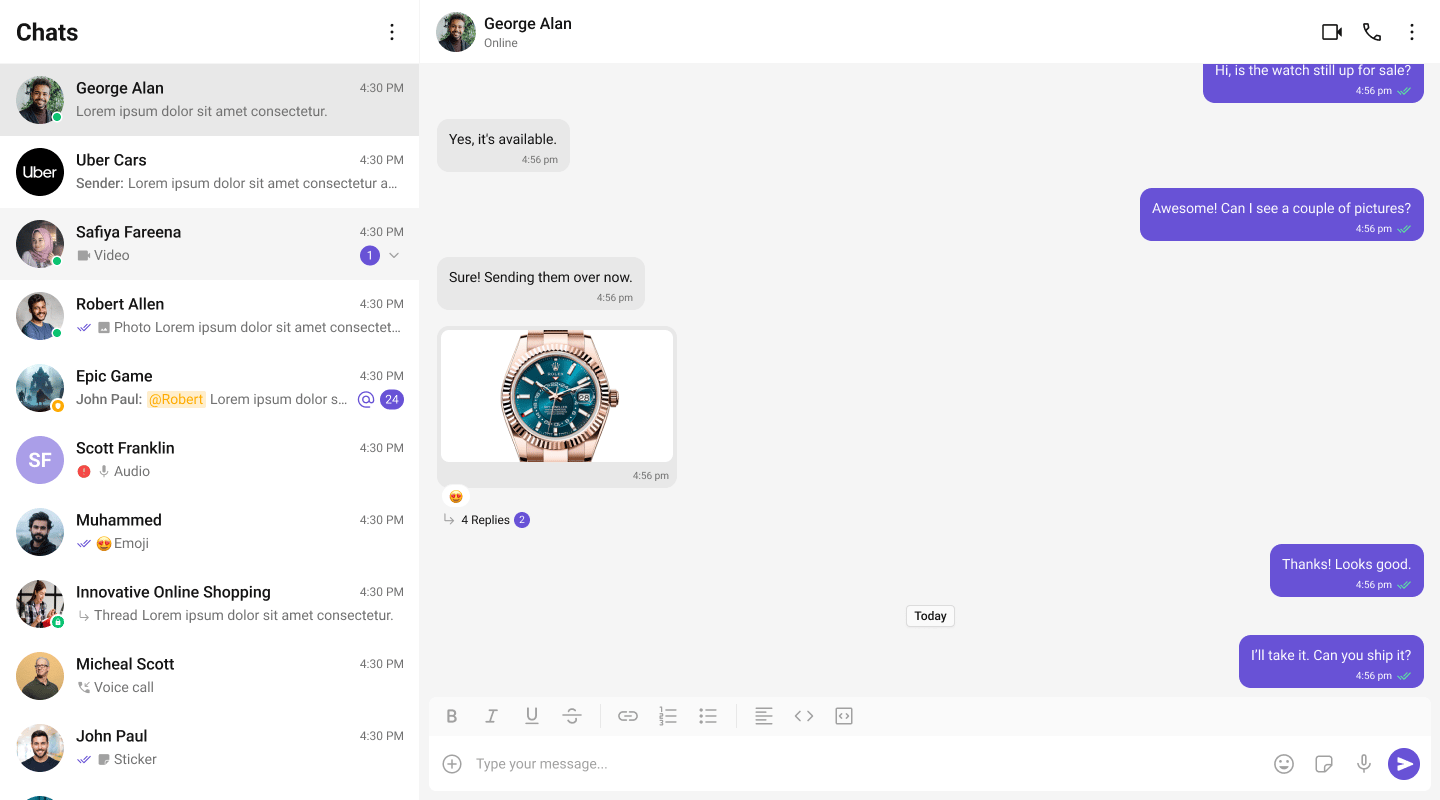
This guide walks you through adding CometChat to a React.js app. By the end you'll have a working chat UI.

<Frame>
  <img src="https://mintcdn.com/cometchat-22654f5b-docs-platform-docs-release/wUW2WqlpbY0fwyuf/images/two_panel_layout_without_tabs_react_v7.png?fit=max&auto=format&n=wUW2WqlpbY0fwyuf&q=85&s=7a79b5140665a8d20e6fee074b4bd5d8" width="1440" height="800" data-path="images/two_panel_layout_without_tabs_react_v7.png" />
</Frame>

***

## Prerequisites

You need three things from the [CometChat Dashboard](https://app.cometchat.com/):

| Credential | Where to find it                                           |
| ---------- | ---------------------------------------------------------- |
| App ID     | Dashboard → Your App → Credentials                         |
| Auth Key   | Dashboard → Your App → Credentials                         |
| Region     | Dashboard → Your App → Credentials (e.g. `us`, `eu`, `in`) |

You also need **Node.js 18+** and npm/yarn installed.

<Warning>
  Auth Key is for development only. In production, generate Auth Tokens server-side via the REST API. Never ship Auth Keys in client code.
</Warning>

***

## Step 1 — Create a React Project

<Tabs>
  <Tab title="Vite (recommended)">
    ```bash theme={null}
    npm create vite@latest my-app -- --template react-ts
    cd my-app
    ```
  </Tab>

  <Tab title="Create React App">
    ```bash theme={null}
    npx create-react-app my-app --template typescript
    cd my-app
    ```
  </Tab>
</Tabs>

***

## Step 2 — Install the UI Kit

<Tabs>
  <Tab title="npm">
    ```bash theme={null}
    npm install @cometchat/chat-uikit-react @cometchat/chat-sdk-javascript dompurify
    ```
  </Tab>

  <Tab title="yarn">
    ```bash theme={null}
    yarn add @cometchat/chat-uikit-react @cometchat/chat-sdk-javascript dompurify
    ```
  </Tab>
</Tabs>

If you want voice/video calling, also install:

```bash theme={null}
npm install @cometchat/calls-sdk-javascript
```

***

## Step 3 — Render with CometChatProvider

Wrap your app in `CometChatProvider` with your credentials. It handles SDK initialization, login, and all internal context setup automatically.

For development, use one of the pre-created test UIDs:

`cometchat-uid-1` · `cometchat-uid-2` · `cometchat-uid-3` · `cometchat-uid-4` · `cometchat-uid-5`

```tsx title="src/App.tsx" theme={null}
import { useState } from "react";
import { CometChat } from "@cometchat/chat-sdk-javascript";
import {
  CometChatProvider,
  CometChatConversations,
  CometChatMessageHeader,
  CometChatMessageList,
  CometChatMessageComposer,
} from "@cometchat/chat-uikit-react";
import "@cometchat/chat-uikit-react/styles";

function App() {
  const [chatUser, setChatUser] = useState<CometChat.User | undefined>();
  const [chatGroup, setChatGroup] = useState<CometChat.Group | undefined>();

  const handleConversationClick = (conversation: CometChat.Conversation) => {
    const entity = conversation.getConversationWith();
    if (conversation.getConversationType() === "user") {
      setChatUser(entity as CometChat.User);
      setChatGroup(undefined);
    } else {
      setChatGroup(entity as CometChat.Group);
      setChatUser(undefined);
    }
  };

  return (
    <CometChatProvider
      appId="YOUR_APP_ID"
      region="YOUR_REGION"
      authKey="YOUR_AUTH_KEY"
      uid="cometchat-uid-1"
    >
      <div style={{ display: "flex", height: "100vh" }}>
        <div style={{ width: 360, borderRight: "1px solid #eee" }}>
          <CometChatConversations onItemClick={handleConversationClick} />
        </div>
        <div style={{ flex: 1, display: "flex", flexDirection: "column" }}>
          {(chatUser || chatGroup) && (
            <>
              <CometChatMessageHeader user={chatUser} group={chatGroup} />
              <CometChatMessageList user={chatUser} group={chatGroup} />
              <CometChatMessageComposer user={chatUser} group={chatGroup} />
            </>
          )}
        </div>
      </div>
    </CometChatProvider>
  );
}

export default App;
```

`CometChatProvider` handles init, login, plugin registration, theming, locale, and real-time events — no manual setup needed. For advanced use cases (custom login flows, individual providers), see the [CometChatProvider](/ui-kit/react/v7/cometchat-provider) guide.

<Note>
  For production, use the `authToken` prop instead of `authKey` + `uid`. Generate auth tokens server-side via the CometChat REST API. Never ship auth keys in client code.
</Note>

***

## Step 4 — Run

```bash theme={null}
npm run dev
```

Open `http://localhost:5173` (Vite) or `http://localhost:3000` (CRA). You should see the conversation list on the left. Click a conversation to open the message panel.

<Frame>
  <img src="https://mintcdn.com/cometchat-22654f5b-docs-platform-docs-release/wUW2WqlpbY0fwyuf/images/two_panel_layout_without_tabs_react_v7.png?fit=max&auto=format&n=wUW2WqlpbY0fwyuf&q=85&s=7a79b5140665a8d20e6fee074b4bd5d8" width="1440" height="800" data-path="images/two_panel_layout_without_tabs_react_v7.png" />
</Frame>

***

## Choose a Chat Experience

### Conversation List + Message View

Two-panel layout — conversation list on the left, messages on the right.

<Frame>
  <img src="https://mintcdn.com/cometchat-22654f5b-docs-platform-docs-release/wUW2WqlpbY0fwyuf/images/two_panel_layout_without_tabs_react_v7.png?fit=max&auto=format&n=wUW2WqlpbY0fwyuf&q=85&s=7a79b5140665a8d20e6fee074b4bd5d8" width="1440" height="800" data-path="images/two_panel_layout_without_tabs_react_v7.png" />
</Frame>

***

### One-to-One / Group Chat

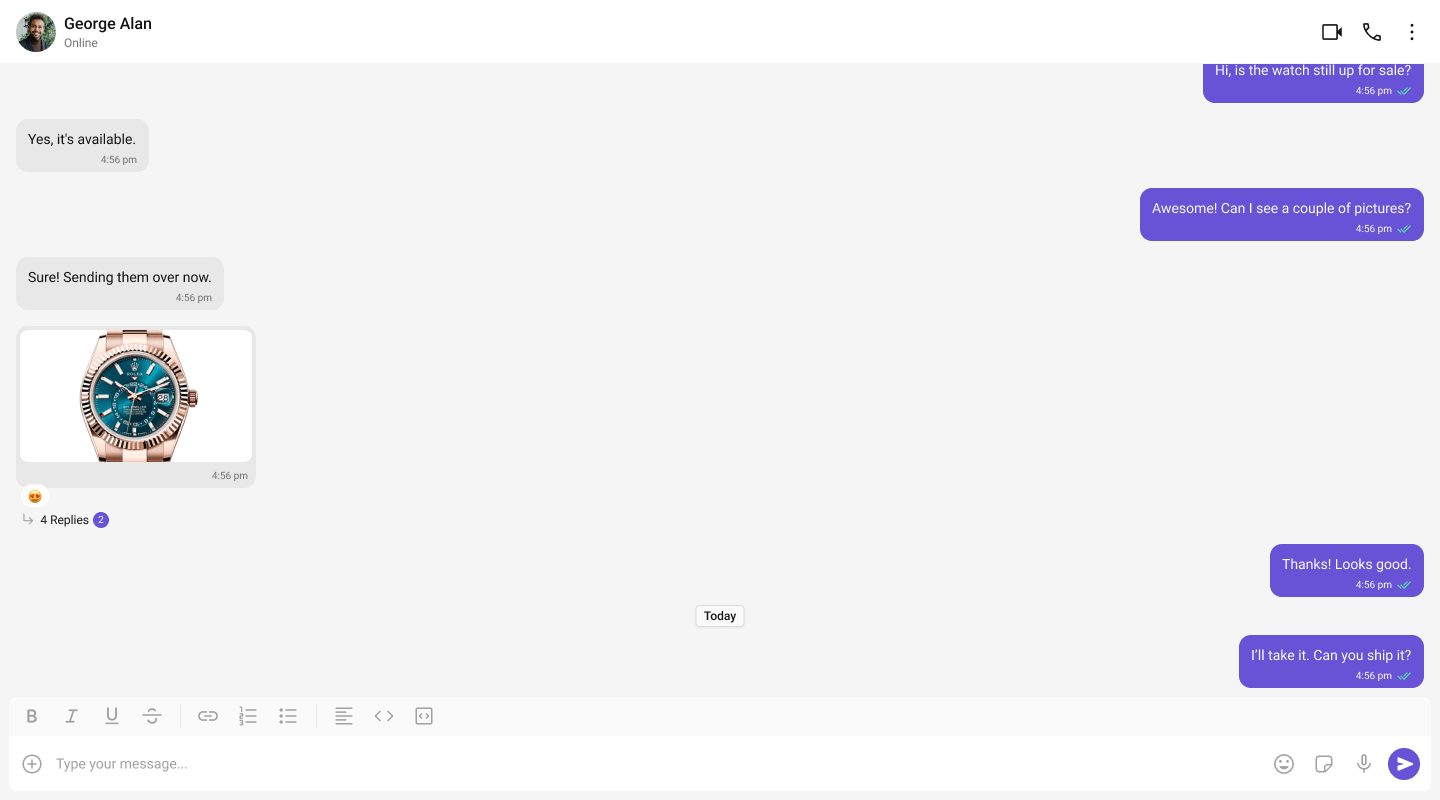
Single chat window — no sidebar. Good for support chat or embedded widgets.
<Frame>
  <img src="https://mintcdn.com/cometchat-22654f5b-docs-platform-docs-release/wUW2WqlpbY0fwyuf/images/one_panel_layout_react_v7.png?fit=max&auto=format&n=wUW2WqlpbY0fwyuf&q=85&s=1a7add7bc165d2c2ae91d4bf0a6af9c3" width="1440" height="800" data-path="images/one_panel_layout_react_v7.png" />
</Frame>

***

### Tab-Based Chat

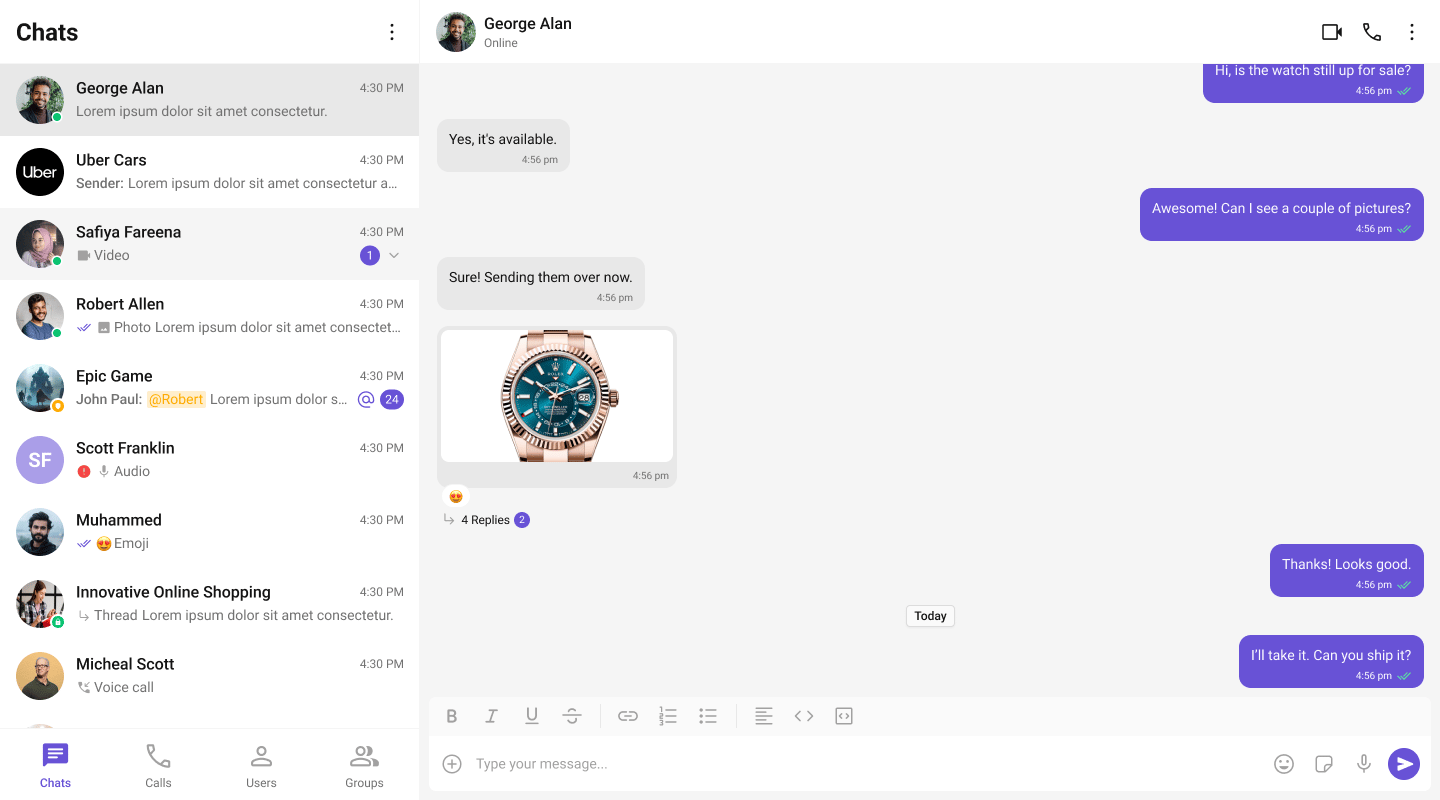
Tabbed navigation — Chat, Call Logs, Users, Settings in separate tabs.
<Frame>
  <img src="https://mintcdn.com/cometchat-22654f5b-docs-platform-docs-release/wUW2WqlpbY0fwyuf/images/two_panel_layout_with_tabs_react_v7.png?fit=max&auto=format&n=wUW2WqlpbY0fwyuf&q=85&s=b926b766b9953927f4e927395b657697" width="1440" height="800" data-path="images/two_panel_layout_with_tabs_react_v7.png" />
</Frame>

***

## Next Steps

<CardGroup cols={2}>
  <Card title="Components Overview" icon="grid-2" href="/ui-kit/react/v7/components-overview">
    Browse all prebuilt UI components
  </Card>

  <Card title="Theming" icon="paintbrush" href="/ui-kit/react/v7/theming">
    Customize colors, fonts, and styles
  </Card>

  <Card title="Plugins" icon="puzzle-piece" href="/ui-kit/react/v7/plugins/overview">
    Customize message rendering
  </Card>

  <Card title="Troubleshooting" icon="wrench" href="/ui-kit/react/v7/troubleshooting">
    Common issues and fixes
  </Card>
</CardGroup>
